Hints & Tips: Knots
Looking over the stacks of requests for tackle and rigging advice, knot-tying ranks near the top month after month. Reliable knots that are easy to tie are the absolute best and the two featured here have become personal favorites over the years. The best way to become proficient with knot-tying is practice, but don't wait until you go fishing. I think the best place to learn to tie is at your kitchen table or workbench.
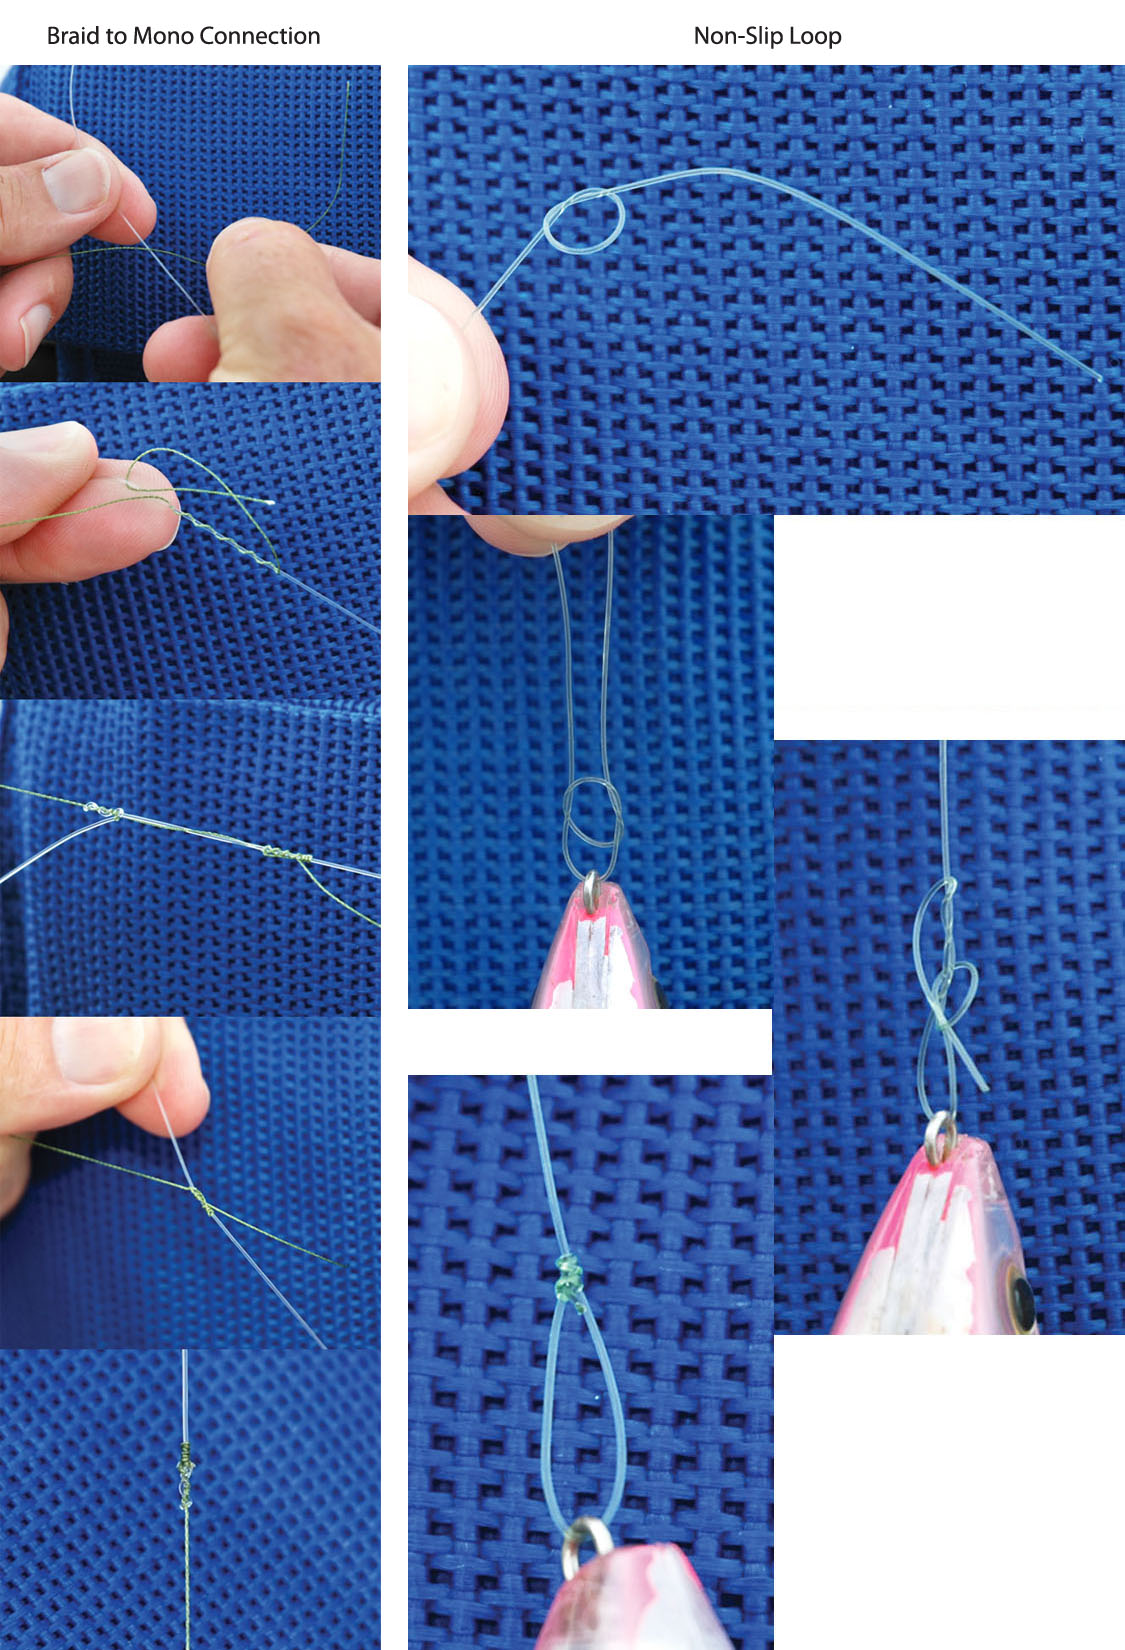
Non-Slip Loop
This knot has never failed me in many years of service. When tied properly, the Non-Slip Loop will not reduce your line's ultimate strength enough to worry about, one of the Non-Slip Loop's great attributes. Another great advantage is found in the way it lets the lure swing freely. A knot that fastens directly to the lure's eye will diminish the dart and dive of soft plastics and slow-sinking plugs. If you want your surface plug to walk-the-dog to the best of its ability you simply cannot beat a loop!
Step-1: Form an overhand knot of about 3/8" diameter near the end of your leader with a 3" tag protruding. As you become more proficient you can shorten the tag which helps conserve the length of your leader.
Step-2: Run the tag through the eye of your lure and then back through the overhand knot. The tag must enter the overhand knot from the same side it exited. You can adjust the size of your final loop by pulling the overhand knot closer to the lure.
Step-3: Hold the overhand knot between your thumb and forefinger and wrap the tag around the standing line five times. Insert the tag end once again through the loop of the overhand knot, taking care to enter from the side where it exited.
Step-4: Moisten the knot, hold the standing line and what will become your final loop, pull tight to cinch it down. Trim the tag and you're done. With a little practice you will learn to form smaller loops, essential when using plugs with multiple trebles as the front treble has an uncanny ability to snag loops.
Braid to Mono Connection
I prefer mono leader rather than attaching braid directly to my lures. My favorite braid is 20/6, which means 20-pound test strength but only 6-pound monofilament equivalent diameter. I start with a six-foot section of 20-pound monofilament leader material as it affords many re-ties. This knot has never failed me during many years of use.
Step-1: Cross the lines as shown and wrap the braid seven times around the leader. Run the tag between the joint of the two lines as shown and then back through the loop that remains between the tag and the wrapped mono.
Step-2: Work the wraps and the loop slowly semi-snug, not tight just yet.
Step-3: Repeat the procedure, wrapping the mono seven times around the braid, and then back through the loop. Note, holding a gap in the joint between the lines with thumb and forefinger helps preserve the gap making insertion of the mono tag much easier.
Step-4: Moisten both sides and slowly begin to work them semi-snug. When you have both sides touching you can begin to apply pressure to seat the wraps.
Step-5: Tug on the tags, I use my teeth, but be careful! Now pull on both lines to test the connection but use caution as braid can give you a nasty cut. Trim the tags and you're done. A clipper designed to cut braid or a scissor both do a nice job, braid is tough to cut. Trim close as protruding tags catch grass and go "bump" on the rod guides. This connection will slide through guides smoothly enabling you to wind the lure close to the rod tip for best casting performance.